
Wall mounts are available for the 7.5-25hp units. They can be mounted on steel or concrete tank walls.
Note: The wall mounts will accommodate water level fluctuations of/or six inches from the optimum level (16" below the fork).

Figure 41
1. Drill a 9/16 inch diameter hole on each side of the wall mount. The placement of the hole will depend on specific applications. Bolt the anchor braces to the wall mount. (Fig. 41A)
2. Slide the pivot tube halfway into the wall mount. (Fig. 41B)
3. Slide the fork onto the pivot tube. (Fig. 41C)
4. Slide the collar onto the bottom of the Mount. (Fig. 41D)
5. Slide the pivot tube into the bottom of the wall mount.
6. Lock the pivot tube in position with the lock bolts in the top and bottom collar.
7. Attach the mount brackets to the forks.
8. A mobile crane will be needed to set the wall mount in place. Drill holes in the wall for four cement anchor bolts. Bolt the wall mount in place. (Fig. 42A)
9. Slip the hand crane into the top pivot tube.
10. Use the hand crane to set the aerator in too the mount brackets. Secure it at a 45-degree angle with four 1 & 1/2 inch capscrew locknuts.
Note: The bolts will be in the 9 & 3 o'clock position in each mounting bracket when the aerator is at a 45-degree angle. The aerator trunnions should be 18 inches above the water level.
11. Bolt the two vortex support angles to the top lip of the forks. (Fig. 42B)
12. Clip the vortex shield cables onto the support angles. The vortex shield should rest on the water surface but not touch the housing.
13. Pivot the fork to position the aerator at the desired angle from the wall and lock it in position with the screws in the pivot tube. The aerator is ready to be wired and put into service.
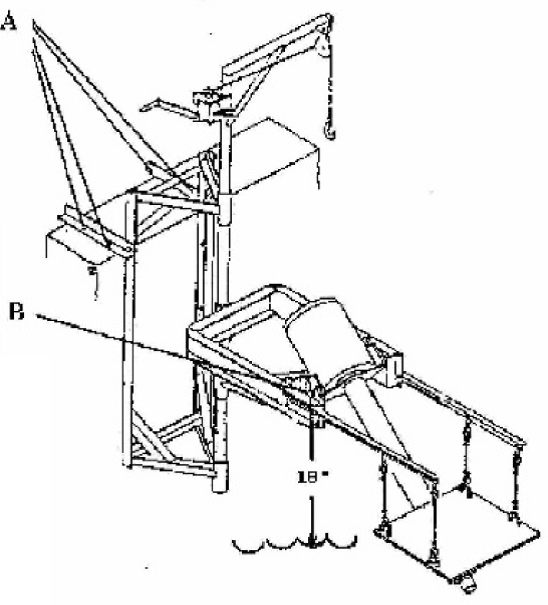
Figure 42
For more information or enquiry, please contact Environmech Sdn. Bhd.
Contact us: http://www.environmech.com/p/contact-us.html Website: www.Environmech.com